


Last update on 2026-06-30 at 06:30 / Affiliate links / Images from Amazon Product Advertising API
I still remember the first time I heated a pen and watched a blank piece of grain transform into something that felt alive. That moment hooked me. It taught me that choosing the right set of tools can turn a hobby into meaningful craft.

Choosing the right wood burning kit in 2026 can feel like a game, but with a reliable pen, well-made burners, and useful tips, you move from guesswork to confidence.
Whether you are refining furniture accents or a small decorative piece, quality supplies save time and improve results. Colwood burners stand out as high-end, USA-made options that balance quality and value for your pyrography projects.
This guide lists ten top burners and essential accessories to help you pick the best kit for your hands and your space. Read on to find the set that fits your style and goals.
Understanding the Essentials of Pyrography
Small steps—like wiping a hot tip—change a hobby into reliable craft. Learning the basics saves hours and frustration. Clean tips give cleaner lines, and that matters more than you might think.
Focus on three fundamentals:
- Keep your tips and pyrography tools clean to avoid messy marks on wood.
- Practice patience: steady, controlled burning makes shading easier and more consistent.
- Choose a reliable burner—tool quality directly affects repeatable results.
Many beginners rush technique and skip maintenance. That leads to rough edges, extra sanding, and lost progress.

By treating upkeep as part of your routine, you speed learning and protect your investment. With basic care and the right approach to woodburning, your projects will look cleaner and feel more professional.
Top Wood Burning Kits for Every Skill Level
A well-chosen set of tools gets you from warm-up strokes to detailed pieces quickly.
Beginner-Friendly Options
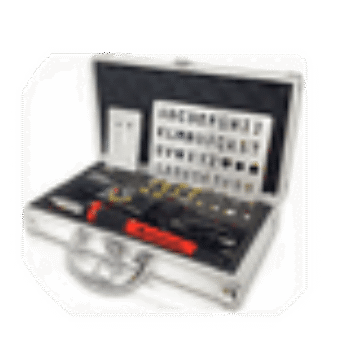
Start with a simple, reliable pyrography pen and a handful of tips. Woodcraft carries entry sets from DeWALT and Wall Lenk that pair a steady pen with basic supplies. These sets help you learn heat control without overwhelming settings.
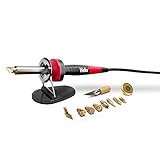
Choose a kit that includes both a ball point and a fine point. That gives you room to practice shading and lines. Solid point burners suit learners who want consistent contact, while wire options offer more varied heat response.

When you need more power and control, consider Colwood 220V machines or pro-grade models from Razertip and WAGNER. These machines deliver steady heat for smoother texture and custom finishes on furniture or smaller pieces.
- Pro tools include replaceable tips and higher power for long sessions.
- Choose between solid-point and wire-style burners based on the finish you want.
- Ensure the set has spare tips and useful accessories for detailed work.
| Skill Level | Example Brands | Best Feature | Recommended Tip |
|---|---|---|---|
| Beginner | DeWALT, Wall Lenk | Simple controls, starter tips | Ball & fine point |
| Intermediate | WAGNER | Adjustable heat, reliable power | Solid point |
| Professional | Razertip, Colwood | Consistent heat, swapable tips | Wire or specialty point |
Key Features to Look for in Wood Burning Kits
A precise dial or digital readout can change a timid stroke into a confident line.
Adjustable temperature and control let you match heat to the grain, the finish, and the effect you want. Look for clear settings so you can repeat results from piece to piece.
Interchangeable tips matter. A solid point gives steady contact for lines. A wire-style tip helps with shading and texture.
Good supplies include stable power and quality accessories. That keeps heat consistent during long sessions and protects your tool and material.
- Adjustable heat for fine detailing and lettering.
- Swapable tips—solid point and wire options—for varied effects.
- Reliable power and accessories to prevent sudden temperature drops.
| Feature | Why it matters | What to look for | Ideal use |
|---|---|---|---|
| Temperature control | Prevents scorching and enables shading | Digital readout or smooth dial | Fine detail, lettering |
| Interchangeable tips | Gives range of marks and textures | Includes solid point and wire options | Lines, shading, texture |
| Power stability | Maintains steady heat in long sessions | Robust cord and reliable transformer | Large pieces, furniture accents |
Essential Accessories and Safety Gear
The right extras — from cleaners to gloves — keep your pen reliable and your results consistent.
Safety gear is the first investment you should make. A heat-resistant glove protects your hand during long sessions. A small fan or good ventilation keeps fumes from lingering in your home.
Cleaning supplies matter just as much. Dirty tips slow your work and ruin finishes. Wipes, tip cleaners, and a soft brass brush keep pyrography tools working and speeds up your time at the bench.
Other useful accessories include spare tips, a stable stand for the pen, and a power strip with surge protection for steady machines. If you work on furniture or a tiny piece, these parts give better control and repeatable results.
- Protective glove and eyewear for safety.
- Tip cleaners, brushes, and gentle solvents for maintenance.
- Spare tips (ball and point styles) and a stable pen stand.
Want help picking products? Visit your local Woodcraft or call Product Experts at 1-800-535-4486. Create an account to track supplies and shop machines, wire tips, and other pyrography supplies.
Incorporating Professional Techniques into Your Craft
Professional techniques lift your projects from hobby-grade to gallery-ready with a few focused practices. This section shows practical ways to add texture, crisp lines, and custom lettering to everyday pieces.
Mastering Shading and Texturing
Shading comes from controlling heat and stroke speed. Use a quality pyrography pen that lets you dial in steady temperature and maintain consistent power.
Work in layers. Start light, then deepen tones with slow, short passes. That method brings depth on a simple wood dowel or a larger panel.
Fine Line Detailing
For crisp lines, keep your hand stable and the tip clean. Swap to a fine-point tip for hairlines and cross-hatching.
Safety matters here: stable power and a steady bench reduce slips and help every stroke land where you expect.
Custom Lettering Methods
Lettering blends steady heat control and layout. Trace guidelines first, then use a low heat for outlines and a slightly higher setting for fills.
Learn from reference books and pro resources to expand your technique. With the right tool and supplies, your lettering will look deliberate and professional.
- Tip: Practice shading scales and letterforms on scrap before committing to a final piece.
- Tip: Keep spare tips and a clean tip cleaner nearby to preserve line quality.
Maintaining Your Burning Tool for Longevity
A sluggish burner usually tells you one thing: the tips need attention. Regular cleaning keeps your burning tool reliable and saves you time on every project.
Quick checks after each session will spot residue that robs heat and reduces power. Unplug the pen, let it cool, and wipe tips with the recommended cleaner.
Organize your kit so supplies and spare tips are at hand. That way you fix issues fast and avoid long delays in a session.
- Clean tips regularly to keep the pen performing at its peak.
- Inspect the wood burner and cord for wear to protect steady power.
- Store burners, tips, and small tools in labeled containers to save time.
Proper maintenance is a simple habit that protects your investment. Treat it like a short ritual. Do this, and your tools will be ready for every future project.
Transforming Ordinary Wood into Extraordinary Art
Small, deliberate marks can lift a basic panel into a custom piece you’ll want to display. With the right touch, a plain board becomes a keepsake for your home or a personalized gift for someone else.
Use a reliable wood burning tool and steady hands to add texture, lettering, and subtle shading. Start light and build depth. That approach helps you control heat and avoid overworking a section.
Try a simple project like a wood dowel or small wall hanging. A focused kit and basic supplies give you the tips and ball points you need to practice finishes and contrast.
- Personalize furniture accents or create a unique piece for your home.
- Shop products by creating an account at Woodcraft to find the right set and extras.
- Finish with a protective coating to lock in texture and color.
Think of this as a fun game: plan a layout, guide the tool with calm, even strokes, and let each pass add tone. That method turns simple woodburning into lasting art.
Conclusion
Good technique grows from steady practice and reliable equipment.
Mastering pyrography means picking a solid pen, practicing often, and keeping your tips clean.
Always use proper safety gear and keep ventilation in mind. That protects you while you try new methods and refine lines.
Follow the expert tips here to choose the right tool for your goals. Be patient: steady work yields better tone and detail than rushed sessions.
With time, care, and the right approach, you can turn plain pieces into heartfelt art. Keep learning, stay safe, and enjoy the process.