Kate Donovan
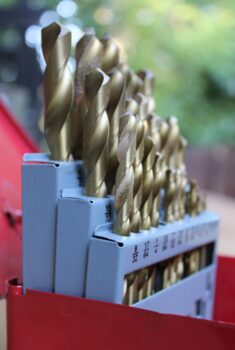
A neat fixing depends on control at the surface—and restraint beneath it.
The mark is precise, but the bit skates sideways, chips the brick face, and grows hot before making useful progress. Push too hard into hollow brick and the far side may blow out, leaving little material for the fixing to grip.
A clean hole is accurately placed, close to the bit’s stated diameter, and surrounded by minimal chipping. That matters because an oversized or ragged opening can weaken an anchor, while a wandering hole leaves brackets out of line. Bit design matters, but so do moderate speed, steady pressure, and knowing when hammer action is more harmful than helpful.
The dependable choice for brick
- Choose carbide For most plug, anchor, and cable holes, a sharp tungsten-carbide-tipped masonry bit offers the best balance of clean cutting, durability, and easy availability.
- Match the job Match the diameter to the fixing, and check that the shank suits the drill chuck. A crisp, undamaged carbide tip is more important than an elaborate bit set.
- Start under control Begin at low speed in rotary-only mode to score the glazed brick face without skittering or chipping. Once the hole is established, hammer action can be added if the brick is hard; softer brick may drill cleanly without it.
- Go large carefully For wide holes required by vents, waste pipes, or ducting, a diamond core bit produces a neater circular opening than trying to enlarge a hole with standard masonry bits.
Avoid ordinary HSS metal bits: they dull quickly on brick and tend to wander rather than cut cleanly.
How brick type changes the drilling method
Soft common brick
A sharp carbide masonry bit, slow speed, and light pressure help prevent the face from crumbling. It generally suits light fixings, but oversized holes can leave anchors loose.
Hard engineering brick
Its dense body can make ordinary bits skate or overheat. Seat a good carbide bit in rotary mode before adding controlled hammer action; use a suitable diamond core for larger service openings.
Glazed brick
The brittle finish chips before the body cuts. Start without hammer using a tile-rated carbide or diamond tip, then change to the appropriate masonry bit once the glaze is breached.
Hollow brick
Thin outer shells can break under heavy pressure or aggressive hammering. Drill gently and use a fixing made for cavities rather than relying on a standard expansion plug.
Perforated brick
Internal webs can deflect the bit or produce uneven resistance. Fixings may need sleeves or anchors designed for perforations, while service holes should avoid fragile edges and known void patterns.
Mortar joints
Mortar may drill more easily, but it can be softer, weathered, or too shallow to hold securely. It is not automatically preferable to brick, especially for heavy loads or precise service penetrations.
What matters more than a large bit set
-
Correct diameter and a sharp tip
The fixing manufacturer’s specified diameter should lead the choice; even a small mismatch can weaken the hold or make insertion difficult. A crisp, symmetrical carbide edge usually produces a cleaner start than a worn bit from a large assorted set.
Look forThe exact stated diameter, with an even carbide tip and no visible chips.AvoidApproximate sizing, rounded cutting edges, or choosing a set mainly for its bit count. -
Enough usable drilling length
Usable length must exceed the required hole depth while leaving room for dust at the bottom. Overall bit length can be misleading because part of it sits inside the chuck.
Look forA clearly stated working length comfortably beyond the anchor’s embedment depth.AvoidBits that only just reach the target depth or list overall length alone. -
A shank and mode the drill supports
Straight shanks fit standard keyed or keyless chucks, while SDS shanks require a matching rotary hammer. The bit should also be rated for rotary-only or hammer drilling as the job demands.
Look forA shank that locks securely and a mode rating matching the drill.AvoidForcing SDS bits into ordinary chucks or using hammer action with an unsuitable bit. -
A design suited to the brick
Dense solid brick may benefit from a robust masonry bit, while soft, glazed, old, or hollow brick calls for better control and gentler cutting. Wide openings may require a purpose-made core rather than an oversized twist bit.
Look forBit geometry and drilling guidance appropriate to the brick’s density and structure.AvoidOne-bit-fits-all claims that ignore fragile faces, voids, or large hole sizes.
Match the bit to the finish
For ordinary wall plugs and light anchors, a sharp carbide-tipped masonry bit is the practical default. A two-cutter tip is usually sufficient for occasional household work, provided its stated use includes brick and its diameter matches the fixing.
When an upgrade is worthwhile
Three- or four-cutter masonry bits tend to track more steadily than basic chisel-tipped designs. Their extra cutting edges can reduce wandering and produce a rounder hole in dense, hard-fired brick. They make most sense for repeated drilling, stubborn material, or fixings that depend on a close-tolerance hole.
For wide, tidy openings—such as routes for pipes or cables—a diamond core bit cuts around the perimeter rather than pulverising the entire circle. Small dry-cut cores can often be used with a suitable drill and arbor for modest openings. Large diameters, deep cuts, and structural walls may require a specialist coring rig, dust control, water cooling, or professional assessment; these are not simply oversized accessories for a standard cordless drill.
Bits that commonly disappoint
- HSS twist bits are intended mainly for metal and lose their edge quickly against fired clay.
- Wood bits can skid, overheat, or suffer damaged spurs without cutting effectively.
- Blunt masonry bits need excess pressure, increasing heat, vibration, and edge chipping.
- Cheap, poorly brazed tips may cut unevenly or shed their carbide insert under hard use.
A glazed brick face needs particular care. A specialist tile, glass, or diamond-tipped bit can gently pierce the brittle surface at low speed and without hammer action; the hole can then be continued with an appropriate masonry bit. Masking tape may help initial positioning, but it does not prevent cracking. Testing on a spare brick is sensible, especially with decorative or irreplaceable finishes.
The shank must match the drill
A masonry bit is useless if its shank does not fit the tool securely. Check the chuck before comparing tip designs or set sizes.
- Round shanks fit standard keyed or keyless drill chucks.
- Hex shanks fit compatible standard chucks and quick-change holders of the correct size.
- SDS-plus shanks require an SDS-plus rotary hammer.
- SDS-max shanks require the larger SDS-max system; they are not interchangeable with SDS-plus.
Brand loyalty should remain secondary. Even when comparing cordless tool brands suited to homeowners, the important checks are physical fit, an appropriate rotary or hammer mode, and good low-speed control. A correctly matched chuck also holds the bit straighter, reducing wobble that can chip the brick face or enlarge the hole.
Choosing the drill behind the bit
A conventional drill is often enough for soft, sound brick, especially for small holes. Starting in rotary-only mode lets the bit score the face cleanly; steady speed and modest pressure matter more than impact.
A combi drill is the practical all-rounder for occasional masonry work. Its hammer setting can speed progress in resistant brick, but engaging it only after the hole is established may reduce edge chipping.
A rotary hammer suits repeated drilling, larger diameters, or dense masonry that stalls a combi drill. It is efficient but usually unnecessary for light shelves and picture fixings. Within a set of essential beginner DIY tools, a corded or cordless combi drill and sound carbide bits cover most jobs; an SDS rotary hammer can be hired or added when tougher work justifies it.
Drill the hole without chipping the face
-
Check the drilling area
Inspect the brick for cracks, loose edges, or damaged joints. Check both sides when accessible, then use a suitable detector and building knowledge to avoid concealed cables, pipes, and metalwork.
-
Mark the centre clearly
Set out the fixing positions before fitting the bit. For aligned shelves or repeated holes, a laser level can keep the layout accurate; a pencil cross gives the bit a clear centre without damaging the face.
-
Make a slow rotary-only start
Begin at low speed with hammer mode switched off. Let the carbide tip form a shallow, stable recess before increasing speed, especially on smooth or brittle brick.
-
Keep the drill square
Hold the drill perpendicular in both directions and apply steady, moderate pressure. A wandering angle enlarges the entrance and can leave the fixing misaligned.
-
Clear dust and add impact sparingly
Withdraw the spinning bit periodically so debris can escape from the flutes. If progress stalls in dense material, add gentle hammer action; excessive impact and force can loosen the hole edges.
-
Control depth and breakthrough
Set a depth stop or mark the bit for the required embedment, allowing space for residual dust. Near a hollow section or visible exit face, switch off hammer action and ease pressure. Where both faces are reachable, a small pilot hole followed by full-size drilling from each side can reduce breakout.
Stop if the bit meets unexpected resistance that could indicate metal or a concealed service.
Troubleshooting rough or reluctant holes
Small symptoms often identify the fault before the brick is badly damaged.
- Wandering: the start speed is too high, the bit is blunt, or a hard inclusion is deflecting it.
- Chipped rim: hammer action began too early, pressure was excessive, or the face is glazed or brittle.
- Slow cutting: check for worn carbide, the wrong drill mode, packed dust, or unusually dense masonry.
- Oversized hole: bit wobble, an inaccurate diameter, or percussion in soft, crumbly brick is likely.
- Overheating: stop and let the bit cool; high speed, heavy pressure, and poor dust clearing usually contribute.
Wear eye, hearing, and suitable respiratory protection, and control dust with extraction where possible. Maintain secure footing and keep leads away from the bit; use properly rated extension cords for power tools, fully unwound and protected by an appropriate safety device.
Stop if hidden electrical, gas, or water services are suspected, or if brickwork moves, cracks, or sheds material. Large core holes require suitable equipment and structural confidence; uncertain work belongs with a qualified tradesperson.
Choose the bit, then protect the brick
- Before drilling, confirm bit diameter, shank fit, drilling mode, depth stop, and the absence of hidden services.
For routine fixings, use a sharp carbide masonry bit in the diameter specified for the fixing. Step up to a premium multi-cutter for exceptionally hard masonry, or a diamond core for large, neat openings. A compatible drill, controlled setup, and restrained pressure matter more than maximum hammer power.