Kate Donovan
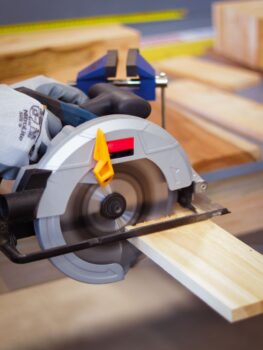
Kickback feels sudden, but its causes are often present before the trigger is pulled.
Halfway through an ordinary cut, the motor note changes, the kerf closes, and the saw jumps back toward the operator. That violent movement usually begins when the spinning blade becomes pinched, twisted, or forced to climb out of the cut.
The underlying problem may be a dull or unsuitable blade, incorrect cutting depth, a loose adjustment, warped material, poor workpiece support, or an offcut that sags and traps the blade. Even a capable saw cannot compensate for a cut line that allows the stock to shift. Useful safety features improve control, but prevention starts with matching the blade, saw setup, support, and cutting plan to the material.
How kickback develops during a cut
A circular saw normally tracks forward with its base plate flat on the workpiece. If the blade becomes pinched, misaligned, or stalled, the rear teeth can catch the kerf and climb upward, driving the saw back toward the operator—often too quickly for a deliberate correction.
Developing kickback feels different from routine tool behavior. Normal vibration is relatively steady, while ordinary motor slowdown usually builds gradually during an aggressive feed and eases when feed pressure is reduced. Warning signs include a sudden rearward tug, harsh chatter, the base plate lifting or twisting, a closing kerf, or the blade wandering off the cut line.
Common triggers include:
- Poorly supported sheet goods or boards sagging into the blade
- A cut that twists because the saw is pushed sideways
- A dull, damaged, dirty, or incorrect blade
- Excessive feed pressure that stalls the motor
- Cutting warped stock or material that shifts unexpectedly
- Restarting with the blade already touching the kerf
If binding starts, release the trigger and hold the saw steady until the blade stops. Never pull a spinning blade backward through the kerf.
Choose features that keep the saw controllable
-
Guard and baseplate
A lower guard should retract smoothly and close promptly; a rigid shoe helps the blade stay square when pressure shifts.
Look forSmooth guard travel and a flat, stiff shoeAvoidSticky guards or a baseplate that flexes -
Adjustments and handling
Depth and bevel locks should clamp firmly, while stable front and rear grips make twisting easier to resist.
Look forPositive locks and comfortable, nonslip gripsAvoidLevers that loosen or grips that strain the wrists -
Visibility and controls
A clear blade-side sightline helps the operator follow the cut without leaning awkwardly. The trigger, safety switch, and depth controls should remain reachable in a normal grip.
Look forVisible cut line and naturally placed controlsAvoidBlocked sightlines or controls requiring a grip change -
Task-matched safeguards
Guide-rail or straightedge compatibility can reduce wandering on long cuts. Saw layout also matters when deciding between a circular saw and a miter saw for the work.
Look forGuidance options suited to the material and cutAvoidFeatures poorly matched to the intended task
An electric brake can shorten blade coast-down after the trigger is released, but it does not correct a pinched kerf, unstable stock, or a twisted feed. Treat it as a useful backup—not a substitute for support, alignment, and controlled cutting.
Match the blade to the saw
Blade choice starts with the saw’s specifications, not the package artwork. Match the required diameter and arbor size, including any approved adapter or diamond knockout. The blade’s rotation arrow must agree with the saw’s arrow, and its maximum RPM must equal or exceed the saw’s no-load speed.
Next, match blade and tooth geometry to the work. Framing lumber generally suits a lower tooth count for fast cuts; plywood and laminates benefit from more teeth and a blade designed for that material. Never use a blade merely because it fits the arbor.
A dull or resin-coated blade needs extra feed pressure and runs hotter, increasing the chance of binding. Warped plates, chipped or missing carbide teeth, cracks, and damaged arbor holes call for replacement—not another cut. Even a sound blade can wobble or loosen if mounted backward, off-center, or against dirty flanges.
Thin-kerf blades remove less material and may suit lower-powered cordless saws, but they can flex more under heat or side pressure. Anti-kickback shoulders limit how aggressively teeth bite; they reduce one risk factor, not careless feeding, poor support, or a pinched kerf.
Disconnect power or remove the battery before handling a blade. Clean the flanges, seat the blade fully, tighten it as directed, and confirm that the guard moves freely.
Support the work, not the bind
The most useful accessories address a specific cause of binding rather than simply making the cut more convenient.
- Clamps stop the workpiece or guide from shifting sideways. They should sit clear of the motor housing, blade path, and intended offcut.
- Rigid straightedges and guide tracks reduce steering corrections that can twist the blade in the kerf. A flexible strip or loosely clamped guide can create the very misalignment it is meant to prevent.
- Sawhorses provide stable support for long boards, but placement matters. Support the main piece and offcut separately without pinching the kerf as the cut finishes; avoid cutting directly between two supports when the board may sag inward.
- Sacrificial rigid foam supports sheet goods across nearly their full area. With the sheet laid flat and the blade set just below its underside, separated sections cannot drop and trap the blade.
Collecting sawdust with a shop vacuum can keep the cut line and guide marks visible. That improves accuracy, but dust collection does not directly prevent kickback and cannot compensate for poor support or a closing kerf.
Give the saw enough power
A corded circular saw depends on steady voltage to maintain blade speed under load. An undersized or overly long extension cord can cause voltage drop, making the motor sound strained and the cut feel sluggish. That may encourage extra pushing, increasing the chance of binding instead of letting the blade cut at its own pace.
Check the saw’s amperage and manufacturer guidance, then select the proper extension cord gauge for the circular saw. Longer runs generally require thicker conductors; with AWG sizing, a lower gauge number indicates a thicker cord.
Set up the cut so nothing can shift
-
Disconnect power and inspect the saw
Unplug a corded saw or remove its battery. Check that the lower guard snaps shut, the blade is clean and undamaged, and the blade, shoe, and adjustment locks are secure.
-
Set shallow blade exposure
Adjust the blade so only one full tooth extends below the workpiece—typically about 3–6 mm (1/8–1/4 inch). Excess exposure increases the blade area that can catch.
-
Mark the cut and clamp the keeper piece
Place clamps where they cannot contact the motor, shoe, or blade. The main piece should remain fixed, while the offcut must be able to separate without squeezing the kerf.
-
Support narrow boards near the cut
Support and clamp the keeper side on a stable bench. A short offcut may hang free; support a long or heavy offcut separately so it cannot lever the board or tear away.
-
Support full sheets across their area
Lay sheet goods on rigid foam or several evenly placed supports. Keep both sides from sagging, but arrange the support so the blade can pass through and the kerf can open freely.
Before starting, trace the entire blade path above and below the work. Move clamps, cords, benches, sawhorses, and hidden fasteners out of the path, and confirm the offcut has a safe place to move.
Rehearse the cut before starting
Before starting, mentally trace the blade from the cut line to the far edge. Check that the shoe will remain supported, both hands can keep their grips, and the stance allows one smooth pass without reaching or stepping. The body should stay balanced and offset from the saw’s likely backward path.
Route the cord or dust hose behind the saw, away from the blade, guide, feet, and offcut. Confirm that the motor housing, guard, and shoe have clearance throughout the cut. Decide where the saw will go after it exits the material—and where it can rest once the blade stops.
This short rehearsal belongs alongside building a practical beginner home toolkit: reliable setup habits matter as much as the tools themselves.
Safety glasses, hearing protection, and dust protection reduce injury or exposure. They do not stop a kerf from closing or a blade from binding; support, alignment, and controlled travel do that.
If the planned stance, hand position, or exit path no longer works, release the trigger and let the blade stop before repositioning.
Make every pass controlled
Start the saw with the blade clear of the workpiece and let it reach full speed before making contact. Set the shoe flat, then keep it planted throughout the cut; lifting an edge makes the saw easier to twist.
Use both hands on the intended grips and advance at a steady rate. The motor should sound consistent and the saw should follow the line without heavy pressure. Never force, pivot, or twist the blade back on course.
If blade speed falls, the line wanders, or the saw stalls, release the trigger and hold the saw steady. Wait for the blade to stop completely, disconnect power, and correct the cause—such as a closing kerf, shifting workpiece, obstructed guide, or excessive feed pressure—before restarting.
Can a wandering saw be steered back onto the line?
Not by twisting it sideways. Stop fully, reset the guide or workpiece, and begin again from a stable position.
What should happen when the motor begins to labor?
Release the trigger rather than pushing harder. Check support, blade condition, cut depth, and power supply before continuing.
How should a stalled blade be handled?
Keep the saw controlled and release the trigger. Disconnect power only after the blade has stopped, then free it and remove the source of binding.
Is restarting inside the kerf acceptable?
Only when the blade is centered and clear of both kerf walls. Bring it to full speed before advancing again.
A running blade can catch a kerf edge during removal. Wait for a complete stop before lifting, backing out, or repositioning the saw.
The final go/no-go check
-
Blade and guard
Proceed only when the blade is compatible, clean, undamaged, and tight, and the guard snaps closed freely.
-
Depth setting
The blade should clear the underside by about one tooth, with the depth lock secure.
-
Support and offcut
Both need stable support that lets the kerf open; neither may sag or fall toward the blade.
-
Guide and path
The guide must be fixed, with the route clear above and below and free of hidden fasteners.
-
Power supply
Use a charged battery or a correctly sized cord that will not snag during the pass.
-
Stance and grip
Stand balanced beside the cutting line, with both hands secure and no need to overreach.
Spend first on a sound blade, clamps, supports, and adequate power. Add premium guides and convenience features later; a dependable guard is mandatory, not an upgrade.
Nonnegotiable: Reset any cut where material can shift, sag, pinch the blade, or conceal an obstruction.